Labs: containers from a compose file
Some lessons need more than one file: a database to query, an API in front of it, a cache beside them. A lab is that set of services, described in a compose file written on the lab’s page or kept in your own GitHub repository.
Set one up, check what it will give each student, publish it and try your own copy, then hand it out like any task. Each student starts their own copy from the lab’s page and it is saved between sessions, then hands it in for you to mark.
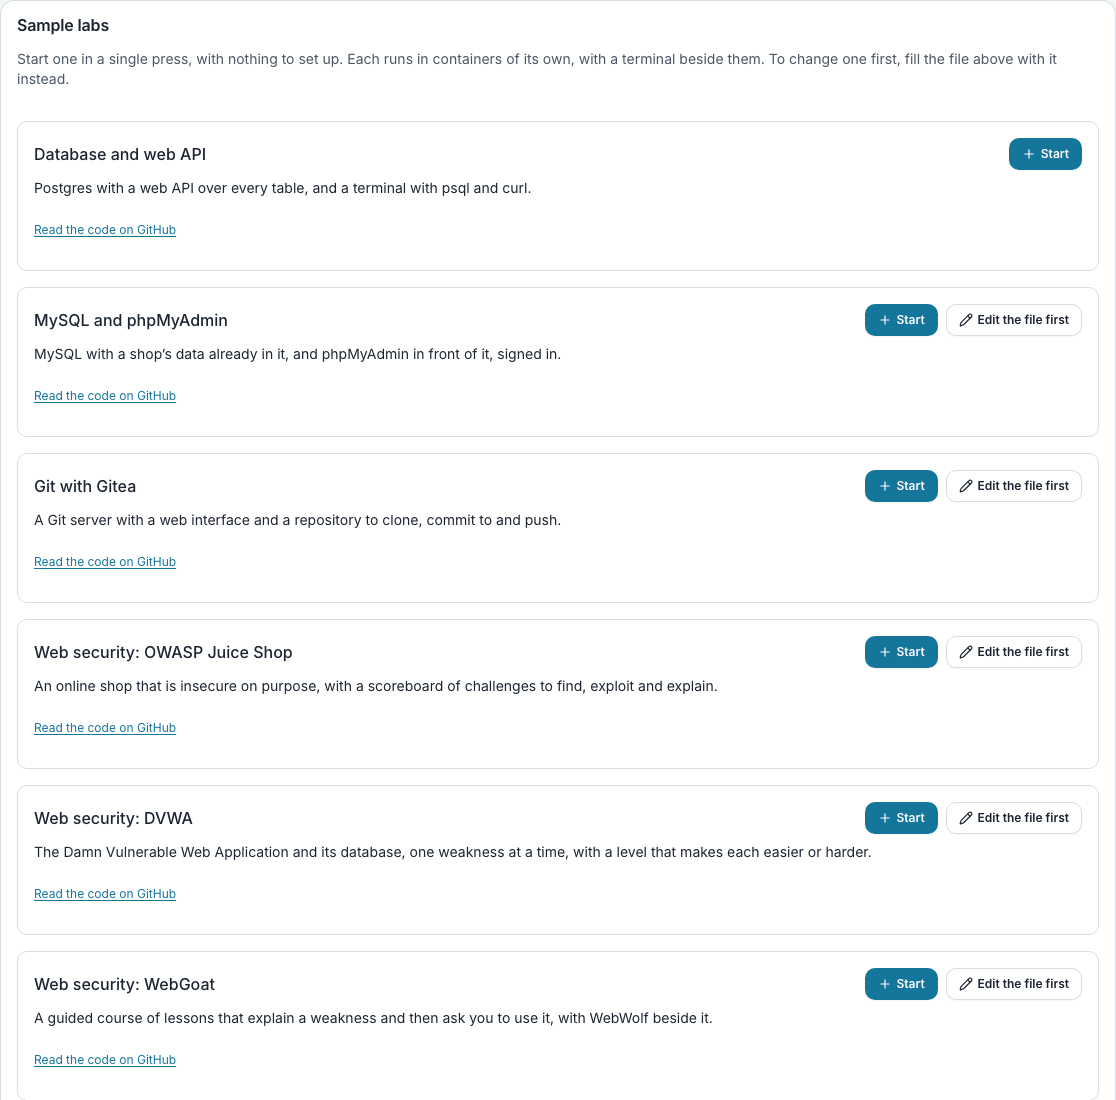
To try one for yourself first, with no module, open Build on the bar and choose Run a container. It is there for visitors too: with no account anybody can start the Git lab or the SQL lab, and every other sample needs a free account. A Sample labs card lists six, a database with a web API, MySQL with a shop’s data and phpMyAdmin in front, Git with Gitea and the Juice Shop, DVWA and WebGoat security labs, each with its own page in this manual, and each has a Start that runs it in one press, or Edit the file first to change it before you start. On that page Start runs what is on screen and keeps the volumes, opening it writes nothing, the file saves a second after you stop typing for an account and is only checked for a visitor, and Undo takes back a sample you have loaded.
A lab can also be an Ubuntu VM: choose Ubuntu VM as the lab’s kind, and each student gets a machine of their own, set up by a script you write. See Setting a VM lab below.
Setting one up
Under Lab, add a task with the Container lab card. A new lab starts as Written here, with a sample already in it: a database, and a web API in front of it, which the terminal can reach with psql and curl. Publish it as it is to see a lab running, or change it first. The file saves a second after you stop typing and is checked as it saves. A file written here can only use images, since there is no repository to build from or read an env_file from.
For anything bigger, choose In a GitHub repository, which keeps the lab’s history and runs the same with docker compose on your own machine. Use the sample points the lab at mitsurutech/lab-sample, whose README is a lesson to go with it; fork it to make it your own. A second, mitsurutech/lab-mysql-phpmyadmin, is MySQL with a learning database and phpMyAdmin, with SQL exercises in its README; give its address to use it. A third, mitsurutech/lab-git-gitea, is a Git server, Gitea, with a repository to clone, commit and push to from the terminal, which has git. Otherwise give the repository’s address, the branch, and where the compose file is from the top of the repository. For a private repository, tick Private and paste a fine-grained personal access token with read-only access to that one repository. It is stored sealed and is never shown again.
The form saves itself. Each save reads the file at the newest commit on the branch and shows what each student would get: every service, the image it comes from, its memory, its ports, and which volumes are kept.
What a compose file may say
A lab runs on machines the whole class shares, so a file may only ask for what is safe to give thirty students at once. Images come from Docker Hub or GitHub’s registry (ghcr.io), or are built from a folder in a public repository: Publish builds those on GitHub first, and the image it makes is public, so keep passwords in an env_file rather than in the Dockerfile. A lab may have up to 6 services and 2048 MB of memory for one student’s copy; a service with no limit of its own counts as 512 MB.
Anything that would reach the machine itself is refused: privileged containers, folders from the machine mounted in, the Docker socket, the host’s network, ports published on the machine, and values filled in from its environment with ${...}. A file that asks for one is refused line by line, every problem at once and each with the line it is on, so you can fix them in one push. A dollar sign the container should see is written $$, as docker compose has it, so a command can still say $$HOME or "$$@".
Trying your own copy
Once a commit is published, press Start on the lab’s page. Your services start in the order the file’s depends_on says, each reachable from the others by its service name, with a terminal beside them: Open the terminal when it is running. Stop and save keeps every named volume and the terminal’s home folder, and Start again brings them back.
The terminal has docker for the lab’s own services, by their names in the file: docker ps to see them and whether they are healthy, docker logs api to read what one printed, docker exec -it db sh to get a shell inside one, docker restart, stop and start, docker inspect, top, stats and cp. Nothing can be created, pulled, built or removed, and only this copy’s services can be reached. An image with no shell in it cannot be entered, just as on a real server.
A service can be opened to the browser by adding a label to it in the file, lab.open: "8080", for a port it lists under ports or expose. While the copy runs, its card has a link to each opened port, at an address of its own. Only the student whose copy it is and the module’s staff can open it. To call an API from Postman, curl or a program, send the copy’s token, shown on the card, in the X-Lab-Token header; New token replaces it if it gets out. Ports carry web traffic: a database client on your own computer cannot connect, so use the lab’s terminal for that. If you open a port that is usually a database or another non-web service (5432, 3306, 6379, 27017 and so on) the page says so and where to reach it instead; it is a notice and never a refusal.
Together they may hold 200 MB. The page warns you as a copy gets near it, and a copy over it when it stops keeps the save from before instead.
Handing it out
Tick the lab on the module’s Tasks tab and Assign, as for any task: students get the usual notice and email. Their link opens the lab’s own page, with your instructions, a Start button for their own copy and the compose file it runs.
Students keep the commit they started on. When you publish a fix, the lab’s page says how many copies are behind, and Update everyone moves them to it the next time each starts, with what they saved kept.
A lesson worked in a lab
A lesson can be backed by one lab, a container lab or an Ubuntu VM lab, so the class reads and types in the same place. In the lesson’s builder, choose the lab under Lab at the top; only the module’s own labs are offered. Several lessons can share one lab, Git part 1 and Git part 2 say, and each person then has one copy and one terminal across all of them.
Add a Command block for each step, a shell command of up to 20 lines. In the lesson, each reader sees the lab’s bar at the top: Start and Stop, a link to each opened port and Open terminal, which opens the full terminal in a new tab. Run on a Command block types that command into their own terminal, so whatever ran from the lesson is in its history, and what it printed appears beneath the block. A command still going after a few seconds, waiting for a password say, carries on in the terminal. Run is pressable once the lab is running, and the lab is never started by it. A VM lab’s terminal is the Ubuntu machine, so Run types into the machine once it has started and its setup script has finished; before that it says the machine is still starting and types nothing.
Staff have their own copy too, so a command run on the projector runs in yours. A student whose lab work is handed in or marked cannot start it from the lesson either. A Command block in a lesson with no lab is flagged in the builder’s list of what is not ready.
Watching and taking over
The lab’s page lists the class: who has started a copy, who has their terminal open now, and two buttons each. Watch opens their terminal read-only, so you see what they type as they type it. Take over lets you type in it: the student’s page says “Your teacher is typing” and their access log records it, and Hand back ends it. The first time you open either, a code is emailed to you, as for any terminal.
For a student who is away, Open saved copy starts what they last saved, in a session of your own with its own terminal. Nothing you change there is saved back to them. It is refused while that student’s own copy is running: watch it instead.
Handing in and marking
A student stops their lab and presses Hand in. What their copy saved is kept as it was at that moment, and the copy is closed: they cannot start it again until you send it back. A lab still running cannot be handed in, so what you mark is exactly what was saved.
The class list on the lab’s page shows who has handed in and who is marked, with Mark beside each. It opens the lab as that student has it: when they handed it in, what they changed on a VM, the conversation with them, and the mark and feedback. Open saved copy, from the class list, starts what they handed in, unchanged, in a session of your own.
Marking tells the student, and keeps the lab closed. Send back opens it again, with a reason if you give one, which they read in the notice and in the conversation. What they handed in before stays until they hand in again.
Publishing
Publish pins the commit you have just checked. Students’ copies start from that commit, and pushing to the branch changes nothing for them until you publish again.
Only named volumes are saved for each student between sessions, together with their terminal’s home folder. Anything else they change inside a container is gone when the lab stops, the way containers behave in production. A new image does not change data a volume already holds: seed data and start-up scripts only run on an empty volume.
Each service runs as its image’s own user, the way docker compose runs it on your machine, unless the file names a user. A copy whose containers write more than 2 GB outside the volumes is stopped, with its volumes saved, so one runaway log cannot fill the disk the class shares.
Setting a VM lab
Under Lab, add a task with the Ubuntu VM lab card. The page holds a short description of the machine instead of a compose file: cpus, memory in MB, disk in GB, open for the ports that open in the browser, and setup, a script run as root the first time each student’s VM starts. It starts from a sample that installs a web server, so Publish and Start show one straight away.
Each student’s VM is kept between sessions, everything on its disk, and you can watch a student’s terminal or take it over as in any lab. The setup runs once per student, and its output is in /var/log/mitsurutech-setup.log on their VM. The VM reaches Ubuntu’s packages, PyPI, npm and GitHub, and nothing else.
A student in a college gets the size you write, up to 4 CPUs, 4096 MB of memory and 20 GB of disk. Anything you leave out is the college’s default, 2 CPUs, 2 GB and 10 GB. Somebody outside a college who opens the lab is held to the size of their own tier instead.
To mark a handed-in VM without reading it yourself, add check, a script in the same form as setup. Run the check on a student’s row in the class list starts a copy of their saved machine that is not saved back, runs your script as root, and shows whether it passed (it exits 0), what it printed, and when. The student is not told the result, and nothing the script does changes their machine.
When a student stops their VM, the class list shows what they changed: the packages they installed, the files they wrote outside the system’s folders, and the history of /etc. You can read it to mark the work without starting their VM.
Networking labs in one VM
A router needs a machine of its own and a student has one VM, so the sample networking labs build the whole topology inside it: every router and every host is a network namespace, every link a pair of virtual cables, and every router runs its own FRRouting, with the vtysh console students meet on real equipment. A VM lab’s page offers three to start from, static routing, OSPF, and BGP between two autonomous systems. Using one replaces the text, and Undo brings yours back.
Everything is installed by the lab’s own setup script, from Ubuntu’s package archive the first time the VM starts, in about ten seconds. It installs a netlab command with it: netlab status lists the machines, netlab shell r1 opens a router’s console and netlab shell h1 a host, and netlab reset starts the lab again. The real commands work as well, which is the point: sudo ip netns exec h1 ping 10.0.3.2, sudo ip netns exec r1 tcpdump -ni to-r2, sudo vtysh -N r1. Each lab leaves a README in the student’s home folder that says what to do and gives none of the answers.
Each sample has a check. It runs on a copy of the saved machine after a fresh start, so it sees only what the student saved with write memory (leaving netlab shell saves too), and it passes only if the real state holds: the routes are in the routing tables, the OSPF neighbours are Full or the BGP session is Established, h1 reaches h2 along the path through the routers, and the private network stays unreachable. Moving an address, a firewall rule, or a route typed with ip route and never saved does not pass it, and the first line of what it printed says why.
To make your own topology, copy a sample and change the topology in its setup: one line for each router, host and link, and daemons ospfd or daemons bgpd to start that protocol on every router. The tool, a topology and a README fit well inside setup’s 16 KB.
Questions people ask
- Should a lab be written here or kept in GitHub?
- Written here is quickest for trying something, and is enough for a lab made of ready-made images. Keep it in GitHub to build images from a Dockerfile, to keep its history, to test it on your own machine with docker compose and to share it with colleagues. Switching between the two keeps what you set for the other.
- Can I use an image I built myself?
- Yes. Push it to ghcr.io as a public image and name it in the file, or let the file build it from a folder in the repository.
- Can students see the compose file?
- Yes, read-only, on the lab’s page beside their own copy. It is how they learn what the lab is made of. The token is never shown to anybody.