Building a lesson a class works through
A lesson is the page you teach from. It holds what you would otherwise hand out in four pieces: what you want them to read, the video you recorded, the worksheet, and the exercises you have set.
You build it a block at a time rather than writing a document, which is what lets you move the video above the code without retyping anything around it.
Make one
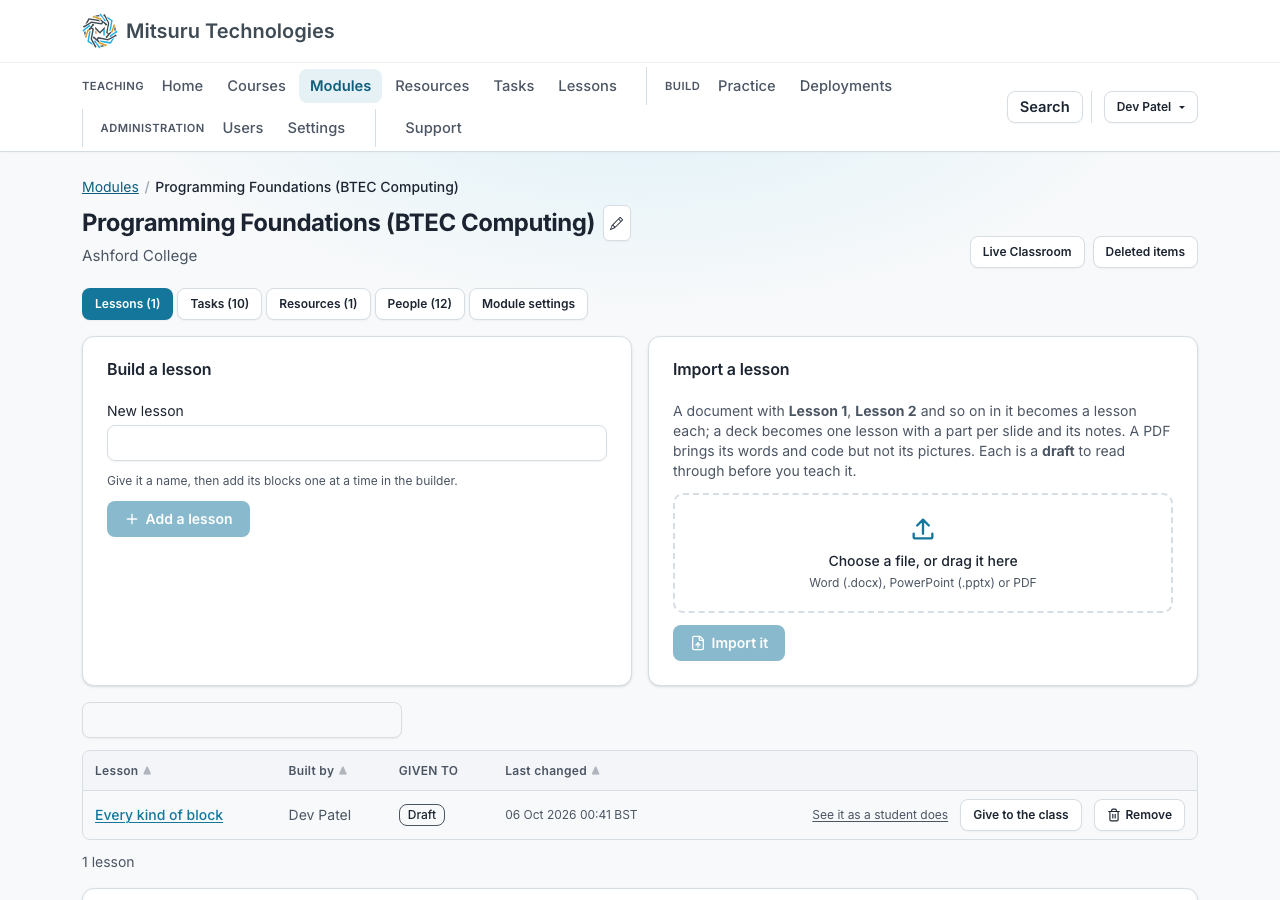
Lessons is a tab on a module’s page, beside Tasks and Resources. Give the lesson a name and press Add a lesson. Anybody teaching the module can build one.
Two lessons on one module cannot share a name, so you are told if the name is already taken rather than ending up with two rows you cannot tell apart.
The lesson gets a web address made from its name, so a link you paste into a message reads as what it is rather than as a string of numbers. Renaming the lesson afterwards changes what it is called and not where it lives, so a link you have already sent a class keeps working.
To show a video from YouTube, press YouTube and paste its address: the one in your browser, a share link or an embed code all work. The video plays in the lesson, so the class does not have to leave it to watch.
To show something from another site, press From another site and paste its address or the embed code it gives you. It works with Vimeo, Loom, Figma, GeoGebra, Desmos, PhET, Google Docs, Slides and Sheets, and Microsoft 365. A Google or Microsoft document has to be shared publicly, published to the web or open to anyone with the link, for your class to see it, which means anybody with its address can read it too.
Check the video has captions, and that they are right. This site cannot see whether a YouTube video is captioned, so it reminds you rather than stopping you: automatic captions often get a technical word wrong, and a student who cannot hear the video gets nothing from it without them.
A YouTube video is played by YouTube, which is part of Google. It is told the address of whoever opens the lesson, and some videos carry YouTube’s own adverts. Our privacy policy says what that means for your students.
Press Picture, video or file to add one. A new file is uploaded into the lesson itself and is not added to the module’s Resources, so a lesson full of screenshots does not fill that tab. You can also choose a file that is already in the lesson or among the module’s resources.
To put a PDF in the lesson, add it as A PDF to read in the page. The class reads it a page at a time with Previous page and Next page, without leaving the lesson, and there is always a link to download it. Only a real PDF is taken: a Word file renamed to end in .pdf is refused, and can be added as a file to download instead.
To play a sound in the lesson, such as a voice note or a clip of a language being spoken, add it as A sound to play in the page. MP3, M4A, Ogg and WAV files work, which covers what a phone records. Press Edit on the block and type what is said into Transcript: it is shown under the player, so a student who cannot hear it can read it, and the lesson reminds you while there is none.
To show a Jupyter notebook, add the .ipynb file as A Jupyter notebook to read in the page. The class sees its text, its code and the results that were saved when it was last run, and can copy any cell. Nothing in it runs. Results saved as HTML, such as some tables, are left out and say so, and a notebook over 5 MB has to be added as a file to download.
A PDF in a lesson is shown as pictures of its pages, and a screen reader reads each page’s words as it is shown. A scanned PDF has no words to read, so a student using a screen reader is told so and can download it instead. Any forms or buttons inside the PDF do nothing in the lesson.
To see how one student is getting on, open the count of students beside the lesson on the Lessons tab and choose their name. You see the lesson as they have it now, with their code, their answers and what they filled in, and nothing on it can be changed. The look is recorded in their work history, which they can read.
There is also a Lessons page on the bar, beside Resources and Tasks, listing every lesson across every module you can see. It is for finding one when you cannot remember which module it is in: search by the name, or filter by college, course or module, and the row opens that lesson’s builder. It also says who built each one, how many students have been given it and when it last changed.
Add the blocks
A block is one piece of the lesson. Press Text to add words: you get the same box you write a task’s description in, with the same buttons for bold, headings and lists, and a preview beside it showing exactly what the class will see.
Pictures, videos and files to download come from the module’s own Resources, so there is one place your files live rather than two. Press “Picture, video or file”, say which of the three it is, and pick the file.
On a code block you can point the class at particular lines: type 4, or 3-5, or 3,7-9 into “Highlight lines”. The lesson says “Look at lines 3 to 5” above the code and marks those rows, so it works for somebody reading it and somebody hearing it. If you name a line the snippet does not have, you are told when you save rather than finding out that nothing was marked.
Press Callout for a box that stands out from the prose around it: Note, Important, Warning, Tip or Requirement. You pick what the box means and the platform picks how it looks, so every callout of the same kind looks the same across every lesson on the site and none of them is a colour somebody in your class cannot read. The box says its word as well as carrying its colour, so it still reads as a warning to somebody who cannot see the difference.
Inside any box of words you can highlight a phrase by putting == either side of it, the way ** either side makes it bold. It works in a task’s description too.
Maths is written between dollar signs, as in $x^2 + y^2$, using the same notation as LaTeX, and is drawn as a formula. Put $$ either side for an equation on a line of its own. A sentence with prices in it, such as between $5 and $10, is left alone, and anything that cannot be drawn is shown as you typed it so you can see what to fix.
There is deliberately no colour picker anywhere. It is the one thing that would let a lesson end up with text nobody can read, and picking what something means rather than what colour it is takes less of your time as well.
Each block shows what it will look like, and opens into its editor when you press Edit. One at a time, so a long lesson stays quick to scroll.
A block you add opens straight into its editor, with the cursor already in its first box, so you can start writing at once. A code block opens its code editor and a quiz its questions, the same as pressing Edit the code or Edit the questions.
There is no Save button on a block. Each one saves itself a moment after you stop typing, and at once when you tick a box or pick from a list. Under the block it says Saving… and then Saved. Close shuts the editor and saves anything still waiting, and so does leaving the page.
If a save does not go through, the block says why, keeps your change on the screen and offers Try again. A picture with neither a description nor the decoration tick, or highlight lines that are not a line, a range or a list, is not saved until it is put right, and the block says what is missing.
Use Up and Down to move a block. There is nothing to drag, which means it works the same whether you are using a mouse, a keyboard or a screen reader.
Headings, and why yours may look different
Write headings in a block the way you always do. The lesson puts them at the right level for you: the lesson’s own name is the top heading on the page, a block’s title comes under that, and your headings sit under your title.
That is worth knowing because it means you cannot make a mess of the page’s structure by accident. Somebody using a screen reader moves through a long lesson by its headings, so an outline that jumps about is hard to follow.
Pictures and videos
When you add a picture you are asked what it shows. That sentence is what somebody who cannot see it hears instead, so write what you would say out loud if you were describing it to the class.
If the picture really is just decoration and carries nothing they need, tick the box that says so and leave the description empty. Ticking it is a proper answer; leaving the box blank is not.
A video with no captions says so on the lesson. Captions are how the students who cannot hear it get anything from it at all, and in a college they are an obligation rather than a nicety.
You are not asked for them when you add the video, because you may not have made them yet. Upload the .vtt file on the video block whenever it is ready, with Edit; the block saves itself as soon as you choose it. You will not be able to present the lesson until you have.
The captions are switched on for everybody when the video plays, and a student can turn them off with the player’s own control. They have to be a WebVTT file, the kind ending .vtt: an .srt file is refused when you choose it, because a browser cannot show one. Most captioning tools can save as WebVTT instead.
Removing a lesson
The Lessons tab lists what is on the module with who built each one and when it last changed, and a Remove beside it. You can remove the lessons you built; an owner of the module can remove any of them.
It goes at once and we offer you Undo for a few seconds, rather than asking you first — nothing here is lost by pressing Remove. After that it is in your deleted items, with all its blocks, until somebody deletes it for good.
The tasks the lesson set are not removed with it. A lesson points at your module’s tasks; it does not own them, so your class keeps their work and you will still find the tasks on the Tasks tab.
Bringing in a Word document, a PowerPoint deck or a PDF
If your lessons are already written in Word, import the document rather than retyping it. On the Lessons tab, choose the file and press Import it. A document with Lesson 1, Lesson 2 and so on in it becomes a lesson each, and anything before the first heading becomes a “before you start” lesson.
It gives you a draft, not a finished lesson. We read your document and guess at what each part was meant to be: your words become text, and the Python in it becomes code you can offer Run on. Read it through and fix what we got wrong before you teach it.
Your paragraphs stay paragraphs, your bulleted and numbered lists stay lists, and a link keeps the address behind it. Each program comes across as one block, indented the way you wrote it, whether you pasted it as its own paragraphs or inside one.
Your tables come across as well, as tables in the lesson. One you have filled in completely, like a list of requirements, is there for the class to read. One with gaps in it, like a test plan you have part-filled, keeps the cells you wrote fixed, and each student fills in the empty ones in their own copy of the lesson.
You cannot edit the cells of a table in the lesson builder yet. You can retitle it, move it or take it out; to change what is in it, fix your document and import it again.
Anything we could not carry is listed for you when it finishes. A link to a video or a worksheet is a file to upload on Resources and then add to the lesson, because a link into your own SharePoint or Google Drive will ask your students to sign in to something they have no account for.
Pictures come across into the lesson where they were, using the description you gave each one in Word. A picture with no description is still brought across, and the lesson reminds you to say what it shows. Charts, text boxes and pictures in a format a web page cannot show, such as EMF, are on that list instead, named by their description or the words beside them.
A lesson whose name this module already has is left alone rather than added twice, and we tell you which. If one of them will not import, the rest still do.
A PDF can be imported the same way. Its words, headings, lists and code come across, worked out from how they looked: large or bold lines become headings and text in a typewriter font becomes code. Page numbers and the lines repeated at the top or bottom of every page are left out. Its pictures come across where they sat when they are JPEGs, which is how most are kept in a PDF; any others are counted so you can add them, and every picture asks you for a description before the lesson is ready. A PDF of scanned pages has no words in it to read, so save the original document as a PDF instead, or import the Word file itself.
Where AI help is on for staff at your college, the AI then checks a PDF’s structure: which lines are headings, which are code and in what language, which are a program’s output, and which are an answer key. It only says what each part already is and never changes your words. An answer key or mark scheme is kept out of the lesson and listed for you instead, so a worksheet does not put its answers in front of the class. It uses the strongest model your college allows and comes out of your AI credits. Anything it was unsure of is listed as something to check, and if it could not run, the import says why and gives you the plain draft.
The same AI check runs on a Word document and a PowerPoint deck. It can also spot an exercise the document sets and a multiple-choice question it asks. An exercise becomes its own words with a code block to do it in, starting from any code the document gave. Questions become a quiz in the lesson, using your questions and options exactly as written. A right answer is only filled in where your document marked one, with a tick or by making it the only option in bold; otherwise you set it. In a deck, speaker notes that teach stay as Teacher’s notes under the slide, and notes that are reminders to you, such as “pause for questions”, are kept out and listed.
If a document is mostly pictures with a few words under each, the import says it may be better shown as it is. You can do that from inside a lesson: choose Picture, video or file, then Slides or a document, and every slide or page is shown as it looks, with the original there to download. Animations, transitions, video and speaker notes do not come across that way.
A PowerPoint deck can be imported the same way and becomes one lesson. Each slide becomes a part with its title as the heading, its pictures come across, and its speaker notes are shown under it as Teacher’s notes, which you can keep, edit or delete. Animations, transitions, videos and charts are listed as things it could not carry.
Seeing a task’s code in the lesson
A task block holding a program shows the program, so you can read a lesson and see what it actually sets without opening anything. It is read-only until you ask for more.
While you are building, press the code and the whole editor opens there, on the task’s own source — what you change is what your class is handed. While you are teaching, press Run and it opens and runs in one go.
Your class sees the code in the lesson too. That means the record of who opened a task now counts opening the editor rather than having read it, since they can see the program without pressing anything.
The link to the task’s own page is still there beside it if you want everything — the tests, the hand-ins and the conversation.
Setting a program inside a lesson
A task block holding a program now opens in the lesson itself. Your class gets the editor, the input box and Run without leaving the page, working on their own copy — the same copy, the same time limit and the same work as opening it on its own page, because it is the same thing.
Hand the task out first. A student who has not been given it has no copy to open, and the block says so rather than showing them an empty editor.
The tests, the hand-in, the history and the conversation are still on the task’s own page, and there is a link to it beside the editor.
The same goes for a web page, an SQL task and a diagram (Mermaid or the whiteboard): each opens in the lesson in its own editor, with the panes and the preview, the Query and Schema tabs and Run, or the board. A lab and a Linux Terminal task still open on their own page.
Putting a block where you want it
Under every block, and above the first one, there is a small “Add a block here” button. Press it and you get the same choices as the row at the bottom of the page, and what you pick goes in at that point rather than at the end. You can still add at the end, and you can still move a block up and down afterwards.
Notes for yourself on any block
Every block has a Teacher’s note beside it, on the right of the block while you build the lesson. Press “Add a teacher’s note”, write what you want to remember, such as what to ask, where a class usually goes wrong or how long to spend. It saves itself as you type.
Only staff who can edit the lesson see it. It is not sent to students at all, and it is never shown on the slides you present, so it is safe to have open in front of a class. The presenter view shows it on your own screen. Empty the box to take a note away.
Running code in front of a class
A code block shows its code wherever you are, in the builder as well as on the page your class reads, so you can tell one snippet from another without opening anything.
You can run any of them yourself. The “Let students run this” tick is about your class, not about you: leave it off for a snippet you want them to read rather than press, and you can still demonstrate it. New code blocks arrive with it on. Whatever it printed appears under the code.
Trying a snippet out in the builder changes nothing in the lesson. Press Edit if you want to change the code your class gets.
While you are presenting, the page shows the lesson itself, exactly what your class has on their own screens, one slide at a time and with none of the block-by-block furniture you build it with. Everything comes back when you press Stop presenting.
Setting work inside a lesson
A block can be one of the module’s own tasks. The student sees what it is, where they stand with it, and a button that opens it there in the lesson.
A quiz and a written task, the kind that is words to read and something to hand in, are done in the lesson itself. It is the same piece of work either way, not a copy: the same attempt, the same time limit, the same marking queue, whether they open it here or on its own page. Handing a quiz in brings them straight back to the lesson with the marking on it.
A coding task, a diagram and anything you have set to lock the screen open on their own page instead, and the link is on the block. Those need the whole window: a coding task needs the editor, Run and its dependencies, and a locked task would not be locked at all inside a page somebody can scroll away from.
One task is open at a time. Opening a second closes the first, which keeps a long lesson somewhere a class can find their place.
What we check before you teach it
A lesson is read through before it goes in front of a class, and anything worth a second look is listed at the top of the builder. Each line says which block and what a student would lose.
One of them stops you: a video with no captions. Students who cannot hear it get nothing from it at all, and for a college that is an obligation rather than a nicety. Add a captions file to the video on Resources and Present works.
The rest are for you to judge. A picture described as “image1” tells somebody who cannot see it exactly as much as no description does, and a link whose words are “here” tells somebody listening to the links on the page nothing at all. But you know your material, so those are shown and not blocked.
Your class never sees this list. They cannot add a captions file, and the video itself already says it has none where that matters to them.
Teach it: Present to the class
Press Present to the class on a lesson and it opens on the screen of every student on the module who has the site open, wherever in it they are. They see the lesson’s name and a few seconds’ warning first, with a Stay here button, so nobody is pulled off a sentence they were halfway through typing.
Everybody else on the module gets it the ordinary way: a notice on their own page, and the email that goes with a new notice, both linking straight to the lesson. So the class that is not at their screens still gets the link rather than missing it.
Press Stop presenting when you are done and it clears within seconds. If you forget, closing the laptop does it for you inside a minute, and moving on to a second lesson simply presents that one instead.
While you present, In this lesson now lists every student who has it open, and a name opens their own version of the lesson in a new tab: their code, their diagram, their quiz, matching or crossword answers and the table cells they filled. You can change any of it there and the change is saved to their copy, not to the lesson. While you have it open, the student’s own lesson page says you are looking and may change it, so their work never changes under them without a word. Both the look and every change go in the access log, which the student can read too.
A lesson can carry a diagram for the class to draw: press Diagram in the builder, and choose Mermaid or a whiteboard. Each student draws on their own copy.
Present it as slides
While you present, the lesson is shown one slide at a time. A block with a title starts a new slide, and the blocks after it without a title join that slide. So to keep a table on the same slide as the words above it, leave the table’s title empty. An imported PowerPoint deck is already one slide per block.
Move with the keys you know from PowerPoint: the arrow keys, Space, Enter, Page Up and Page Down, N and P. Home and End go to the first and the last slide, and a number then Enter goes to that slide. B or full stop blanks the screen to black, W or comma to white, and any key brings the slide back. F goes full screen, Esc leaves it, and F5 starts from the first slide. A presentation clicker works too. Every key also has a button on the bar above the slide.
Keys never turn a slide while you are typing: in a quiz, a code editor or any text box they do what they always do.
Hide extras skips every slide marked Extra, so you can teach the exam-level path and leave the rest for students who want more. The setting is remembered on this computer.
Your class follows you. Every student with the lesson open sees the slide you are on, within a few seconds, with a line saying which slide it is. Read on my own lets a student scroll the whole lesson, and Follow the teacher brings them back. If your page reloads, press Present to the class again and you carry on from the slide the class is on.
Presenter view opens a second window for your own screen, like PowerPoint’s speaker view: your notes for the slide on the projector, the title of the next slide, the slide number and a clock. The same keys work in it, and it moves the projector window. Put the lesson window on the projector and the presenter view on your laptop. Your class never sees your notes.
Working a lesson in a lab
A lesson can be backed by one lab, a container lab or an Ubuntu VM lab, so the class reads and types in the same place. In the builder, choose the lab under Lab at the top; only the module’s own labs are offered, and several lessons can share one, so each person has one copy and one terminal across all of them.
Add a Command block for each step: a shell command of up to 20 lines. Each reader sees the lab’s bar at the top of the lesson, with Start and Stop, a link to each opened port and Open terminal. Run on a Command block types that command into the reader’s own terminal, so it is in their history, and what it printed appears beneath the block. Run never starts the lab; it can be pressed once the lab is running. In a VM lab the terminal is the Ubuntu machine itself, so a command is typed into the machine; a Run pressed while the machine is still starting, or still running the lab’s setup script, says so and types nothing. A Command block in a lesson with no lab is flagged in the builder’s list of what is not ready.
Git Basics is the worked example: a lesson with a Command block for each step of git config, git init, git add, git commit and git push, in a Gitea lab of its own. SQL Basics is a second, in a MySQL lab with phpMyAdmin: it adds one table to a small shop’s database, then inserts, selects, joins, updates and deletes rows, one SQL command to a block. API Basics, Juice Shop Basics, DVWA Basics and WebGoat Basics follow the same pattern, each container lab has a second lesson, and Static Routing Basics, OSPF Basics and BGP Basics are worked in the three networking VM labs, and every lab added since has one too, so every lab has a basic lesson. Every new college has all of them in its sample modules, every college can copy them from the library, and every personal account is given them. The Labs page of this manual, under A lesson worked in a lab, has the rest.
Who can change it
Whoever built the lesson can change it, and so can anybody who owns the module. That is deliberately looser than a task, which stays with the person who wrote it: a class should not be stuck with a broken lesson because the person who made it is off that week.
See it as a student does is a link on the lesson, so you can read the whole thing the way your class will before the lesson starts.
Deleting a module puts its lessons in the bin with it, and taking a file out of Resources takes it out of any lesson showing it. Restoring either brings the lesson back as it was.